— Your Fun and Friendly Guide to Mastering the Google Cloud Platform Console!🌐🛠️🚀
Hello, Cloud Adventurers and Future GCP Gurus! 🌟😄
Welcome to an exciting journey through the Google Cloud Platform (GCP) Console! Whether you’re a seasoned developer or a curious newbie, navigating the GCP Console can unlock a world of possibilities for your projects. Think of it as your magical dashboard 🧙♂️✨, where you can control and manage all your cloud services with just a few clicks.
So, grab your favorite beverage ☕, put on your explorer hat 🎩, and let’s dive into the GCP Console together!
🌟 What is the GCP Console?
The GCP Console is a web-based interface that allows you to manage your Google Cloud resources. It’s like the cockpit of a high-tech spaceship 🛸—sleek, powerful, and a bit overwhelming at first glance. But don’t worry! By the end of this guide, you’ll navigate it like a pro. 😎
🚪 Getting Started: Accessing the GCP Console
Step 1: Sign Up or Sign In
- New to GCP? Head over to Google Cloud Platform and click on “Get started for free” to create an account. You’ll get a $300 credit to explore GCP services! 🤑
- Already have an account? Go to the GCP Console and sign in with your Google credentials.
🗺️ The Lay of the Land: GCP Console Overview
Upon logging in, you’ll be greeted with the Dashboard. Let’s break down the key components:
1. Navigation Menu 📂
Located on the left, this is your primary way to access GCP services.
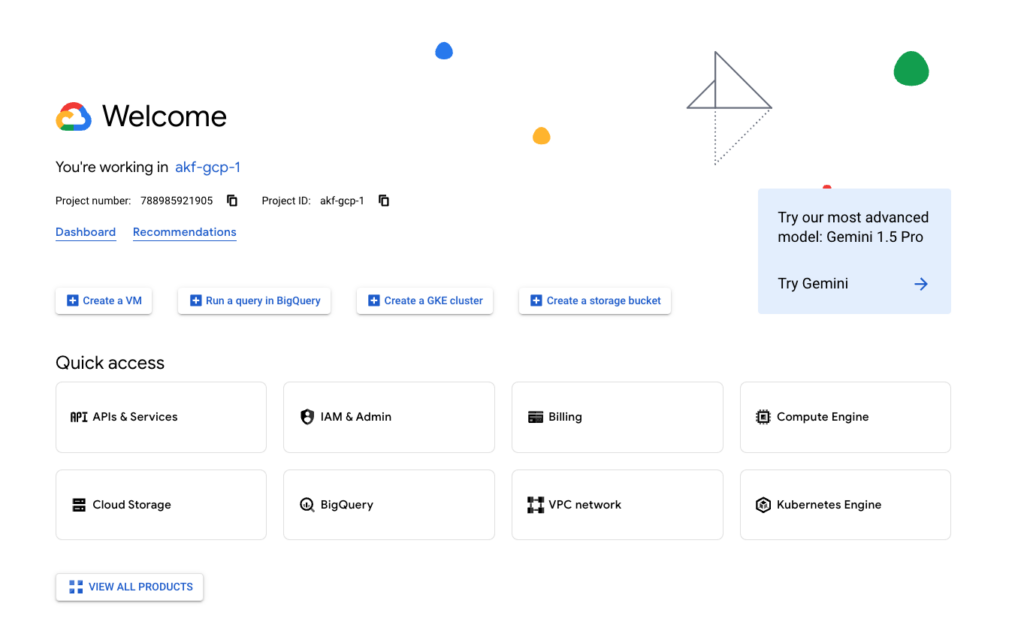
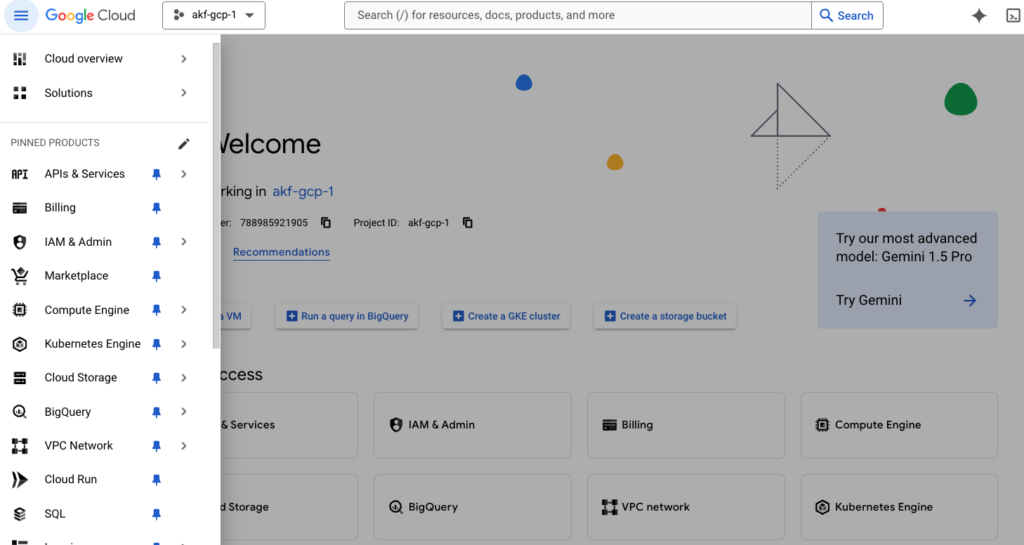
GCP Console with the Navigation Menu expanded, highlighting Compute Engine, Cloud Storage, etc.
2. Project Information 📋
At the top, you’ll see your current project name and ID. Projects are the main way to organize your resources in GCP.
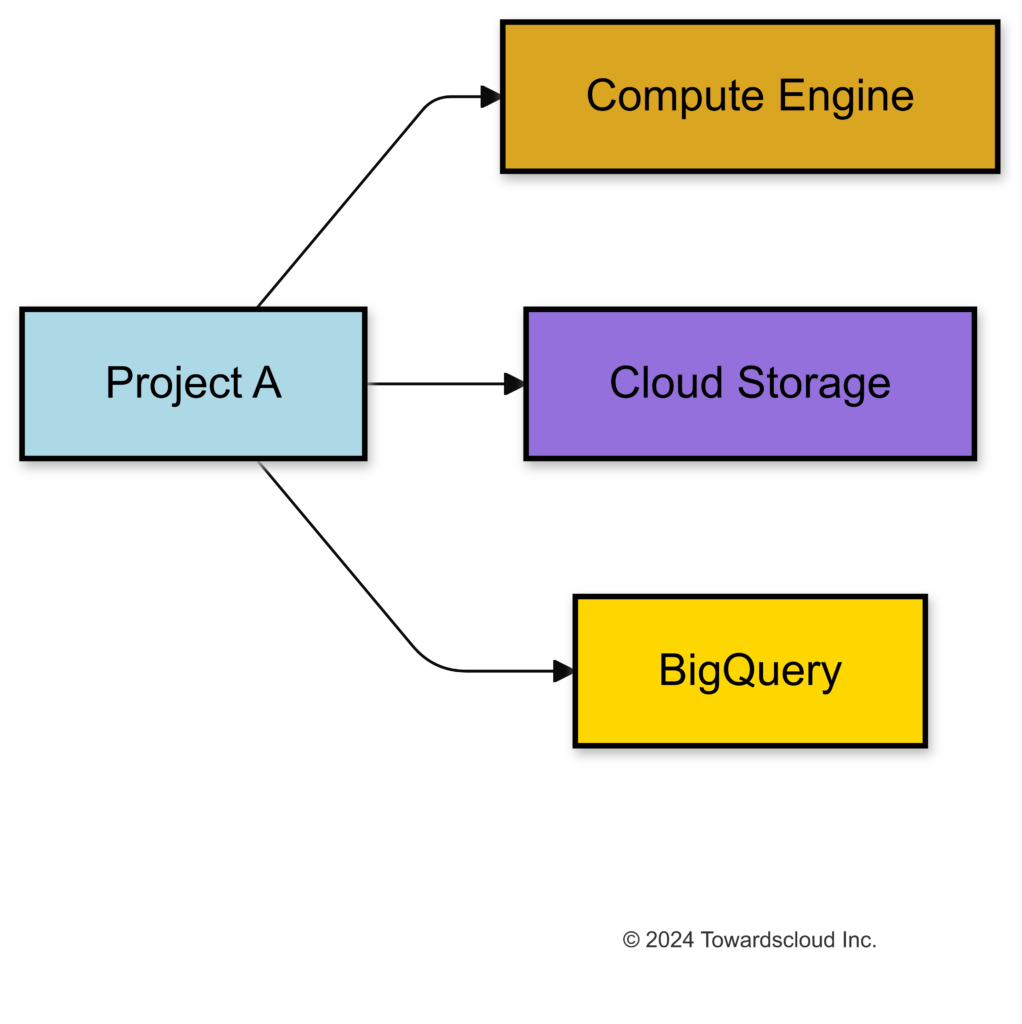
This diagram shows that Project A contains Compute Engine, Cloud Storage, and BigQuery resources.
3. Search Bar 🔎
Need to find something quickly? Use the search bar at the top to search for services, APIs, or resources.
4. Pin Favorite Services 📌
You can pin frequently used services to the top bar for quick access.
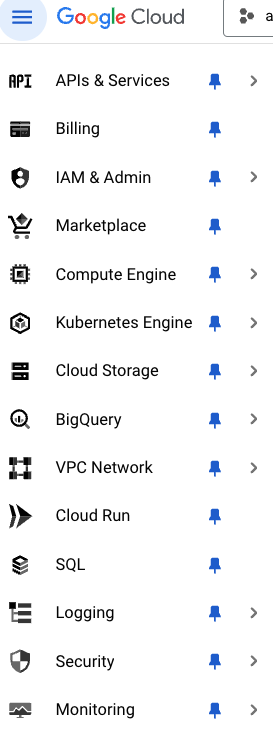
Screenshot showing services like Compute Engine and Cloud Storage pinned at the top for easy access.
🛠️ Navigating Key Services
Let’s explore some essential services and how to access them.
Compute Engine 🖥️
Compute Engine lets you create and manage virtual machine instances.
How to Access:
- Click on Navigation Menu > Compute Engine > VM instances.
- Here, you can create new instances, monitor existing ones, and manage settings.
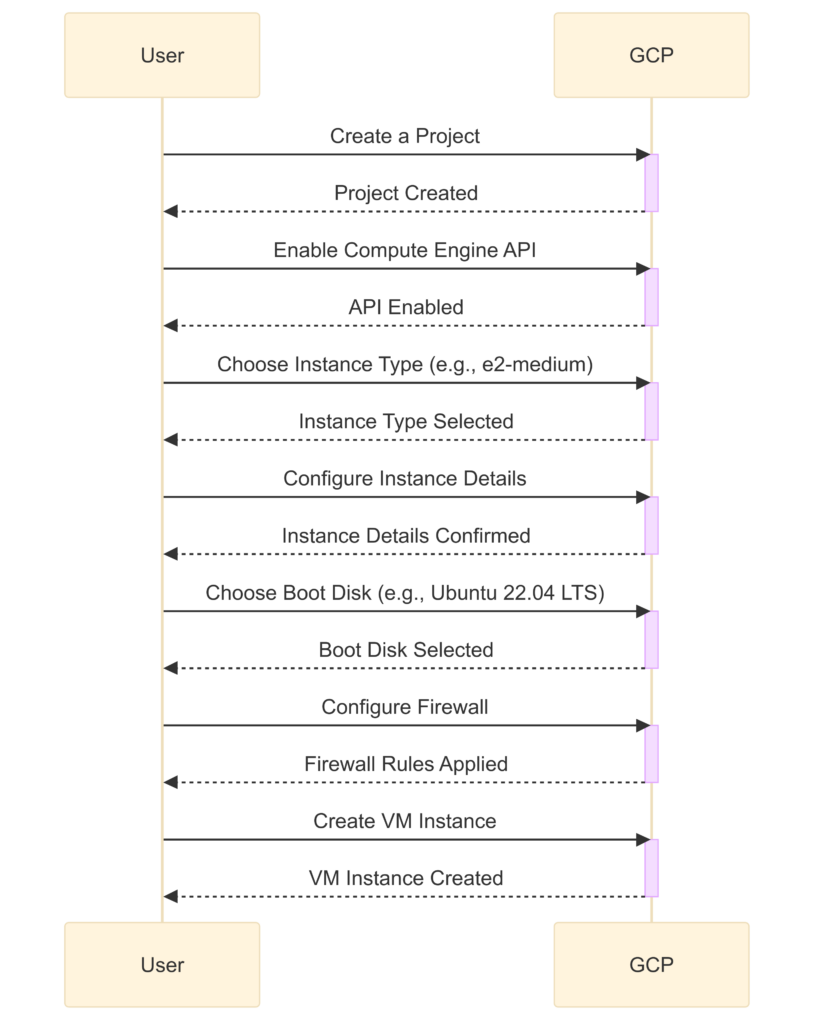
This sequence diagram shows the steps to create a VM instance.
Cloud Storage ☁️
Store and retrieve data with ease.
How to Access:
- Go to Navigation Menu > Storage > Browser.
- Create buckets, upload objects, and manage permissions.
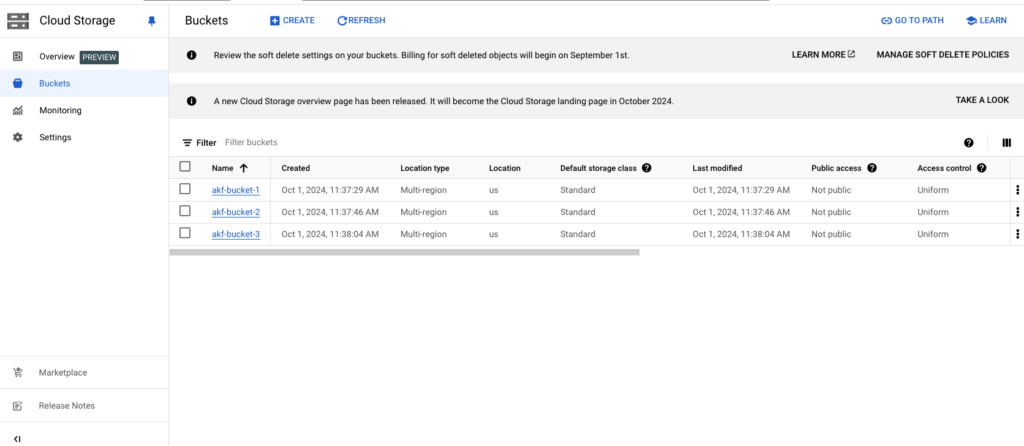
Screenshot showing the Cloud Storage Browser with a list of buckets.
BigQuery 📊
Analyze large datasets with Google’s serverless, highly scalable data warehouse.
How to Access:
- Navigate to Navigation Menu > BigQuery.
- Run queries, manage datasets, and visualize data.
🔐 Managing IAM and Permissions
Control who has access to your resources.
How to Access:
- Click on Navigation Menu > IAM & Admin > IAM.
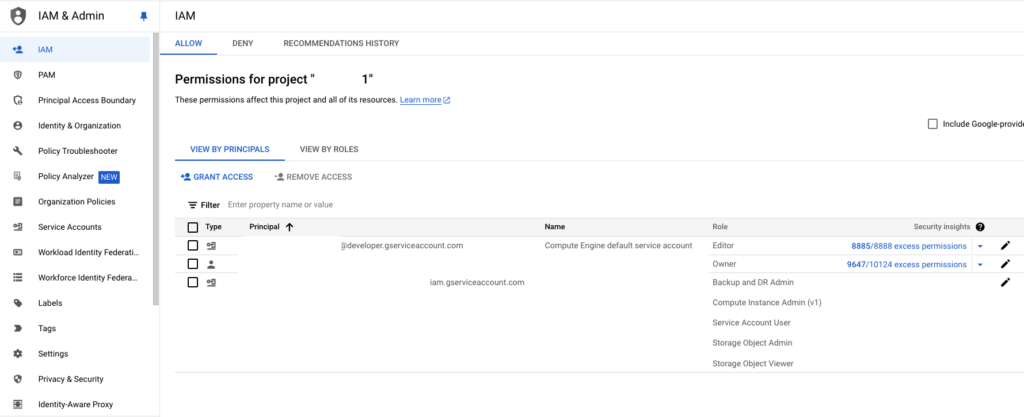
This diagram illustrates how users and service accounts are assigned roles within a project.
🔔 Setting Up Billing and Budgets
Keep track of your spending to avoid surprises! 😮
How to Access:
- Go to Navigation Menu > Billing.
Features:
- Dashboard: Overview of your billing account.
- Transactions: Detailed list of charges.
- Budgets & Alerts: Set spending limits and receive notifications.
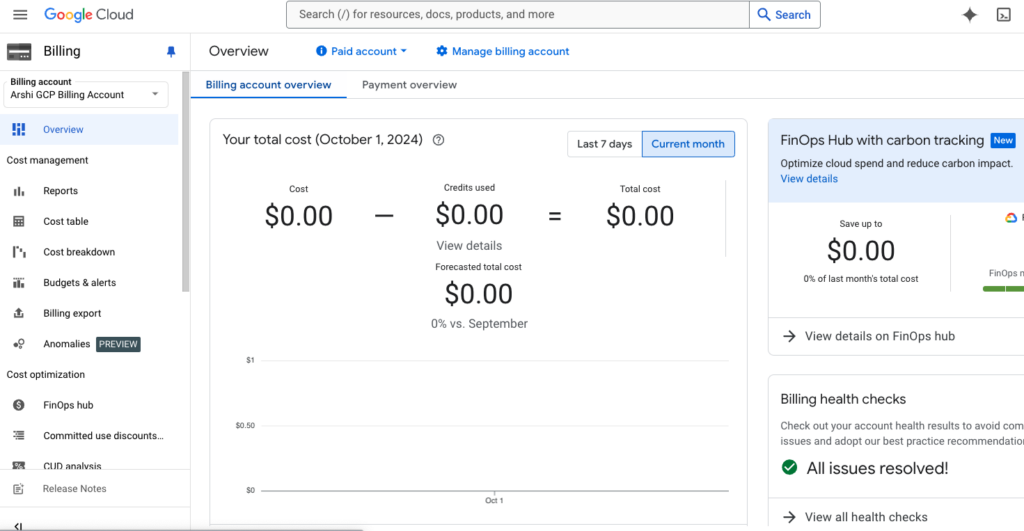
Screenshot showing the Billing Dashboard with charts and cost breakdowns.
🧰 Tools and Shortcuts
Cloud Shell 🖥️
A built-in command-line interface right in your browser.
- Access: Click the Activate Cloud Shell icon “>_” in the top-right corner.
- Use Case: Run gcloud commands, manage resources, and automate tasks.


Screenshot of the Cloud Shell terminal open at the bottom of the console.
Cloud Console Mobile App 📱
Manage your resources on the go!
- Download: Available on Google Play and App Store.
- Features: Monitor resources, receive alerts, and perform basic management tasks.
🎯 Tips and Tricks for Efficient Navigation
- Use Keyboard Shortcuts: Press “?” to view available shortcuts. ⚡
- Customize Your Dashboard: Rearrange widgets to prioritize information important to you. 🖼️
- Leverage the Cloud Marketplace: Quickly deploy solutions and services. 🚀
🤖 Automate with APIs and SDKs
Prefer code over clicks? GCP offers robust APIs and client libraries.
- APIs & Services: Enable APIs for your project via Navigation Menu > APIs & Services.
- Client Libraries: Available for languages like Python, Java, Go, and more.
---
config:
  look: neo
---
flowchart LR
    Developer["Developer"]:::blue
    ComputeAPI["Compute Engine API"]:::purple
    StorageAPI["Cloud Storage API"]:::purple
    BigQueryAPI["BigQuery API"]:::purple
    PubSubAPI["Cloud Pub/Sub API"]:::purple
    FunctionsAPI["Cloud Functions API"]:::purple
    SpannerAPI["Cloud Spanner API"]:::purple
    LoggingAPI["Cloud Logging API"]:::purple
    CreateVM["Create VM Instance"]:::yellow
    StoreData["Store Data in Cloud Storage"]:::yellow
    QueryData["Query Data in BigQuery"]:::yellow
    PublishMessage["Publish Message to Topic"]:::yellow
    TriggerFunction["Trigger Function on Event"]:::yellow
    ManageDatabase["Manage Spanner Database"]:::yellow
    WriteLogs["Write Logs to Cloud Logging"]:::yellow
    Developer -->|Uses| ComputeAPI
    ComputeAPI -->|Performs| CreateVM
    Developer -->|Uses| StorageAPI
    StorageAPI -->|Performs| StoreData
    Developer -->|Uses| BigQueryAPI
    BigQueryAPI -->|Performs| QueryData
    Developer -->|Uses| PubSubAPI
    PubSubAPI -->|Performs| PublishMessage
    Developer -->|Uses| FunctionsAPI
    FunctionsAPI -->|Performs| TriggerFunction
    Developer -->|Uses| SpannerAPI
    SpannerAPI -->|Performs| ManageDatabase
    Developer -->|Uses| LoggingAPI
    LoggingAPI -->|Performs| WriteLogs
    classDef blue fill:#5479f7,stroke:#000000,color:#ffffff,stroke-width:2px;
    classDef purple fill:#5f2999,stroke:#ffffff,color:#ffffff,stroke-width:2px;
    classDef yellow fill:#fcc64d,stroke:#000000,color:#000000,stroke-width:2px;
Invisible[" "] ~~~ Copyright["© 2024 Towardscloud Inc."]
    classDef Sky stroke-width:1px, stroke-dasharray:none, stroke:#374D7C, fill:#E2EBFF, color:#374D7C
    classDef copyrightStyle fill:none,stroke:none,color:#333333,font-size:10px,text-align:right
    classDef invisible fill:none,stroke:none
    style Invisible fill:none,stroke:none
    style Copyright fill:none,stroke:none,font-size:8px
This diagram shows the interaction between a developer and GCP APIs.
😄 Let’s Add Some Humor!
Why did the cloud go to school?
To become a little smarter! 😆☁️
📢 Final Thoughts
Navigating the GCP Console might seem daunting at first, but with a bit of exploration, you’ll find it’s an intuitive and powerful tool. It’s your central hub for managing all things cloud, from deploying virtual machines to analyzing big data.
Remember, the key to mastering the console is to explore, experiment, and don’t be afraid to click around! After all, curiosity didn’t kill the cat—it launched it into the cloud! 🐱☁️
🤗 Join the Conversation!
Have tips, tricks, or experiences with the GCP Console? Share them below! Let’s help each other become GCP pros. 💬
P.S. Why did the developer join the circus? Because they wanted to work on their juggling of multiple cloud services! 🎪🤹
The Journey Continues…
Thanks for joining me on this exciting tour of the GCP Console! I hope you’re feeling more confident and ready to take on the cloud.
Until next time, keep your spirits high and your clouds well-configured! ☁️✨
Disclaimer: No virtual machines were harmed in the making of this blog post, though some electrons were mildly excited. 😉🔌
Let’s Keep the Conversation Cloudy!
Feel free to share this post with friends, colleagues, or anyone who’s ready to navigate the GCP Console with confidence and a smile. Together, we’ll conquer the cloud! ☁️🏔️
Note: All emojis are intended to add a splash of fun and visual excitement to the topics discussed. 🎨✨