Hello, cloud explorers! 👋 Ready to embark on a journey through the mystical land of the Azure Portal? 🧙♂️ Whether you’re a seasoned IT pro or just dipped your toes into the azure waters, this guide will help you navigate the portal like a pro—and maybe crack a smile or two along the way! 😄
So grab your virtual compass 🧭, and let’s dive into the heart of Microsoft’s cloud kingdom! 🏰
Introduction to the Azure Portal 🌀
The Azure Portal is your one-stop-shop for managing all your Azure services. Think of it as the cockpit of your cloud spaceship 🛸—with all the buttons, knobs, and levers you need to steer your cloud journey.
What’s Inside? 🎁
- Unified Console: Manage all your services from a single place.
- Customizable Dashboard: Personalize your view for quick access.
- Integrated Tools: Built-in tools for monitoring, security, and more.
Azure Portal Overview | Microsoft Docs
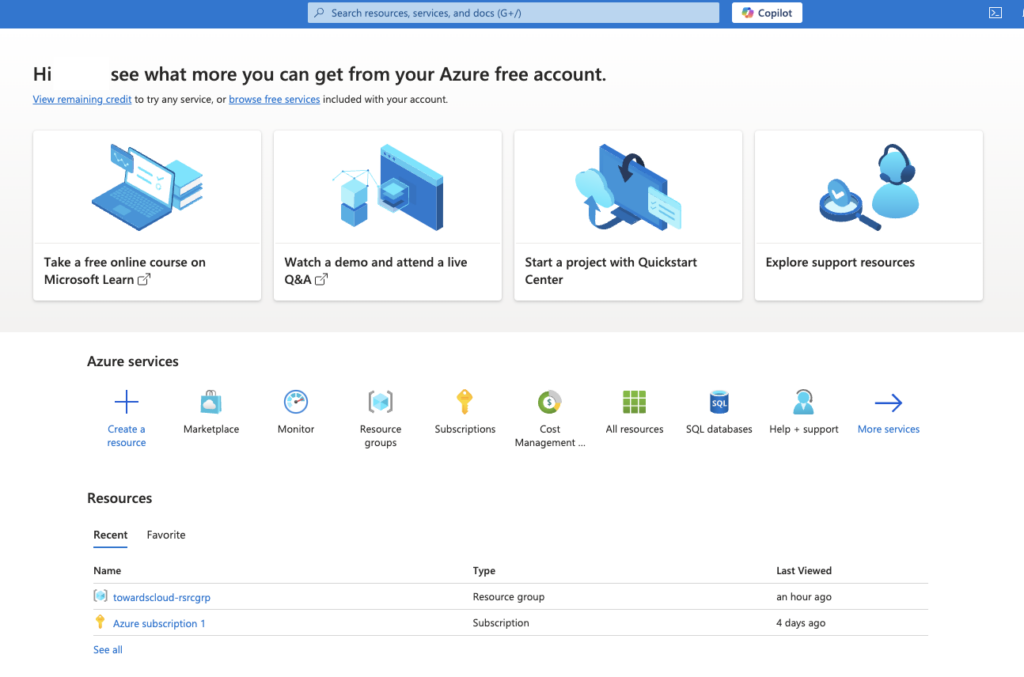
The Azure Portal home screen showcasing the dashboard and navigation menu.
Dashboard Customization: Your Cloud, Your Way 🎨
Personalizing Your Dashboard 🖌️
Why settle for the default view when you can jazz it up? Let’s make your dashboard as unique as your coffee order! ☕️
- Add Tiles: Click on the “Edit Dashboard” button.
- Drag and Drop: Choose from a variety of tiles and widgets. Drag them onto your dashboard.
- Resize and Arrange: Adjust the size and position to suit your needs.
- Save: Click “Done Customizing” to save your masterpiece.
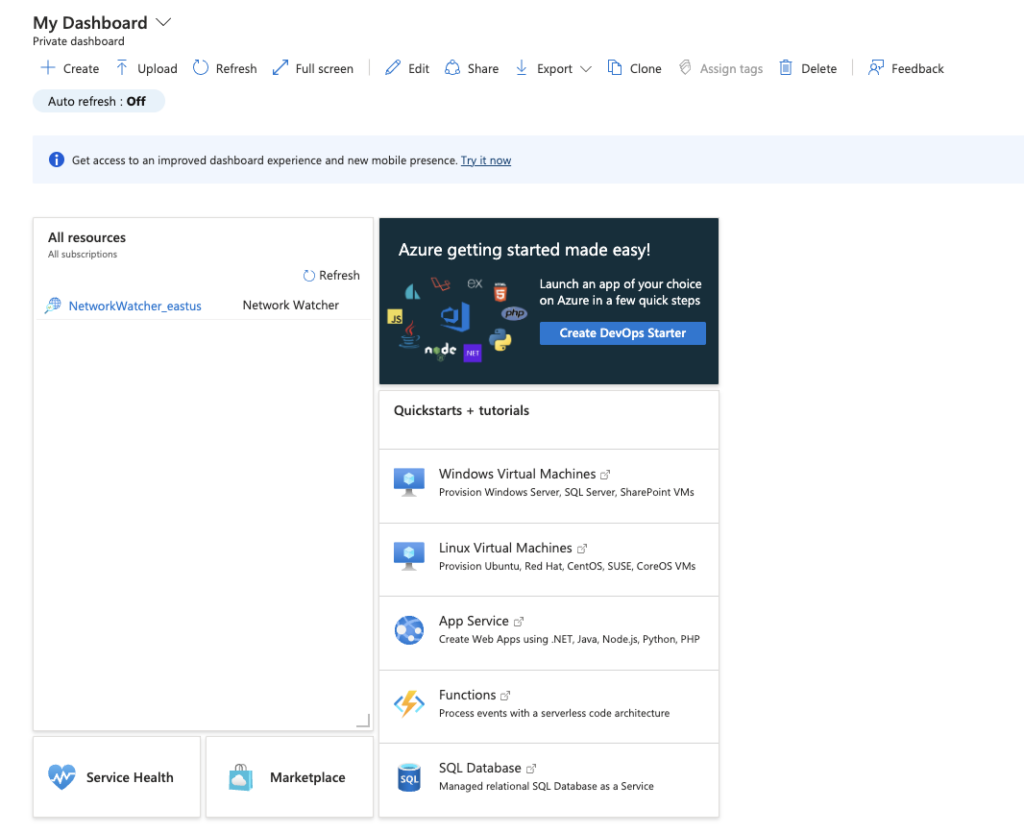
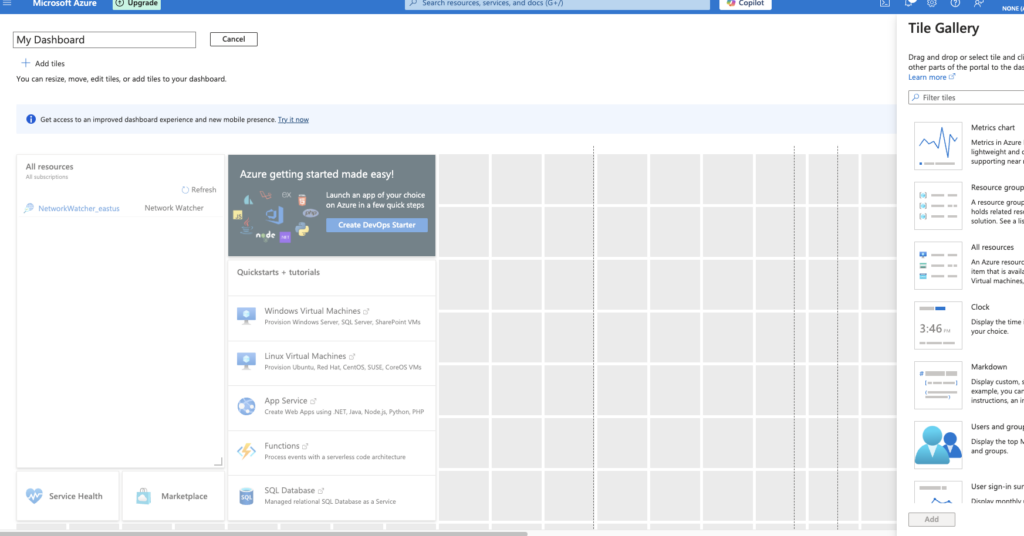
Customizing the Azure dashboard with various tiles and widgets.
Create and Share Dashboards in the Azure Portal | Microsoft Docs
Pro Tip: Create Multiple Dashboards 🧠
Why stop at one? Create different dashboards for different projects or roles. Switch between them faster than you can say “Azure-mazing!” 🌟
Resource Management: Taming the Cloud Beasts 🐉
Creating Resources: Let There Be Cloud! ☁️
- Click on the “+ Create a resource” button.
- Browse or search for the service you need (e.g., Virtual Machine, Storage Account).
- Fill in the required details like name, region, and resource group.
- Click “Review + create” and then “Create”.
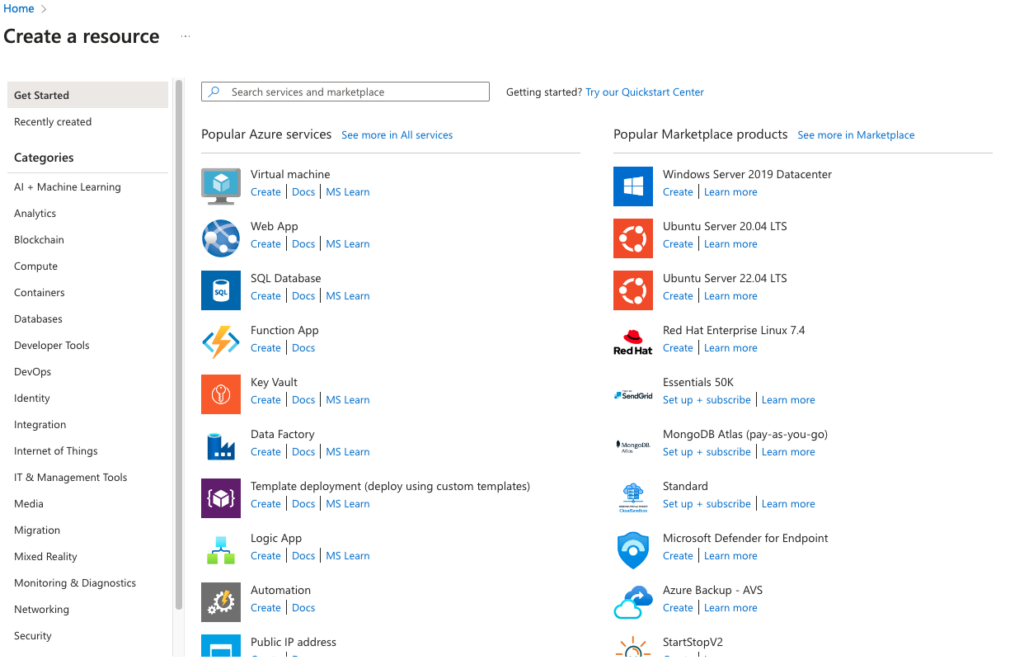
The “Create a resource” page with options to select various Azure services.
Azure Resource Manager Overview | Microsoft Docs
Organizing with Resource Groups 📁
Think of resource groups as folders for your cloud stuff. Keep things tidy, and your future self will thank you! 🙌
- Create a Resource Group: Navigate to Resource Groups > Add.
- Add Resources: Assign resources to your group during creation or by editing their settings.
%% Diagram: Azure Resource Organization
graph TD
    classDef blue fill:#5479f7,stroke:#000,color:#fff

    A[Resource Group]:::blue --> B[Virtual Machines]:::blue
    A --> C[Storage Accounts]:::blue
    A --> D[Networking Resources]:::blue
Invisible[" "] ~~~ Copyright["© 2024 Towardscloud Inc."]
    classDef Sky stroke-width:1px, stroke-dasharray:none, stroke:#374D7C, fill:#E2EBFF, color:#374D7C
    classDef copyrightStyle fill:none,stroke:none,color:#333333,font-size:10px,text-align:right
    classDef invisible fill:none,stroke:none
    style Invisible fill:none,stroke:none
    style Copyright fill:none,stroke:none,font-size:8px
Diagram: Organizing resources within a resource group.
Real-World Example: Project Deployment 🚀
You’re deploying a new web application. Create a resource group named “AwesomeApp” and add all related resources—VMs, databases, storage—to it. Now, you can manage or delete the entire app’s resources in one go! 💡
Access Control and Security: Who Goes There? 🕵️♀️
Role-Based Access Control (RBAC) 🔐
Control who can do what in your Azure environment.
- Navigate to the resource or resource group.
- Click on “Access control (IAM)”.
- Click “Add role assignment”.
- Select a role (e.g., Reader, Contributor) and assign it to a user or group.
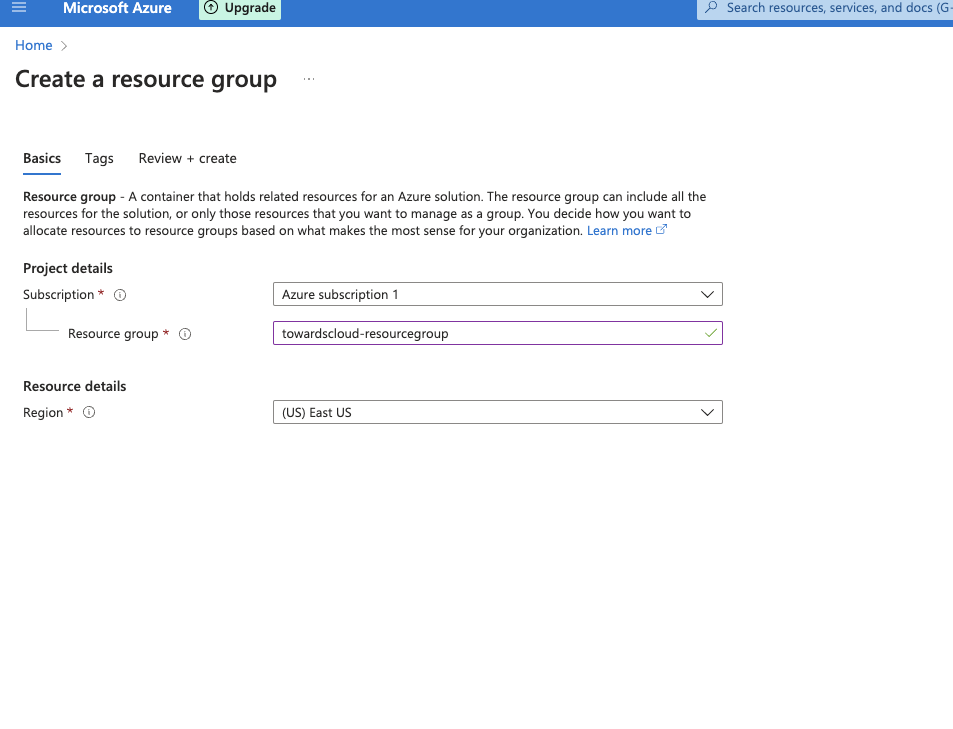
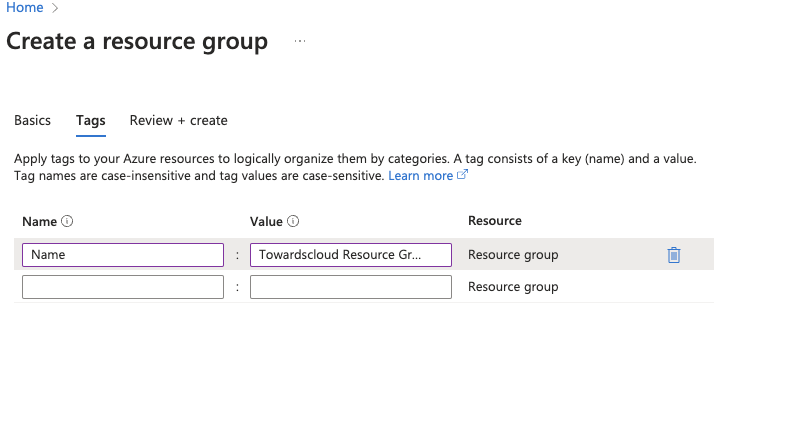
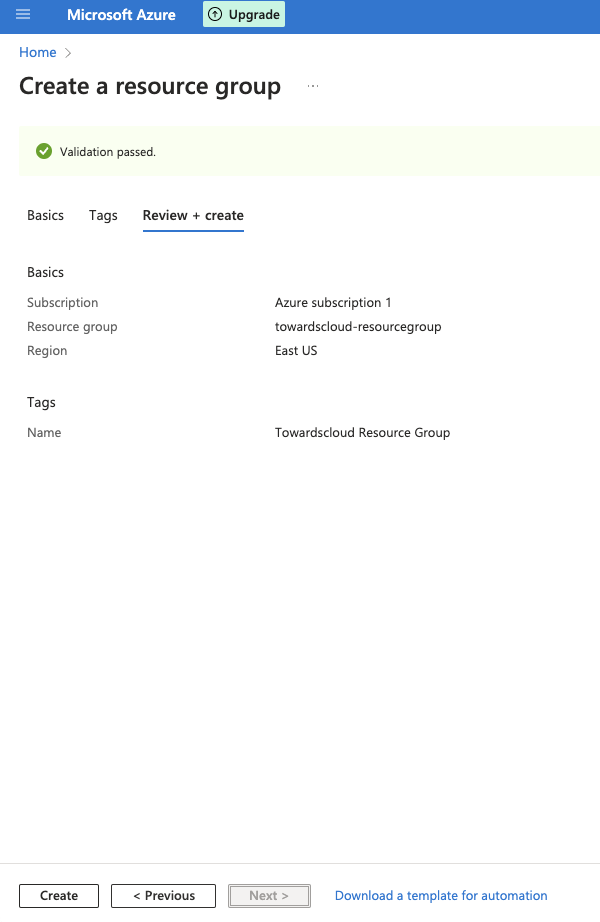
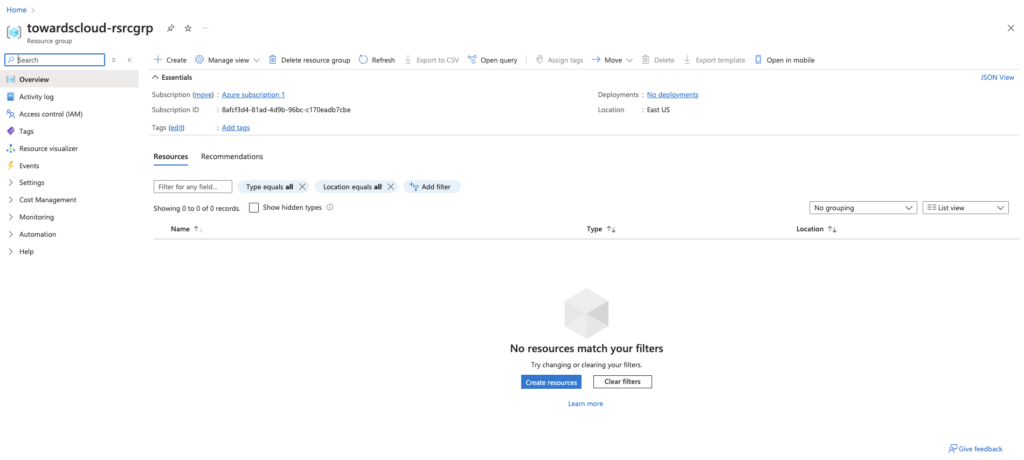
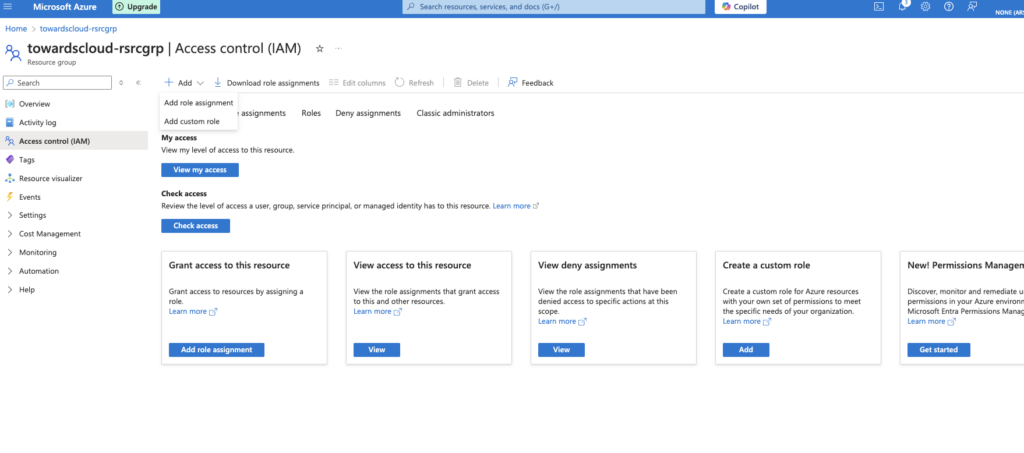
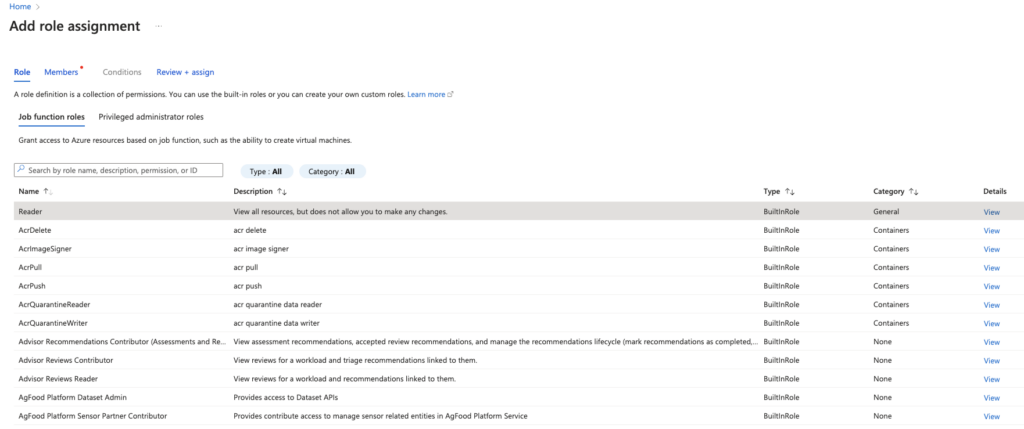
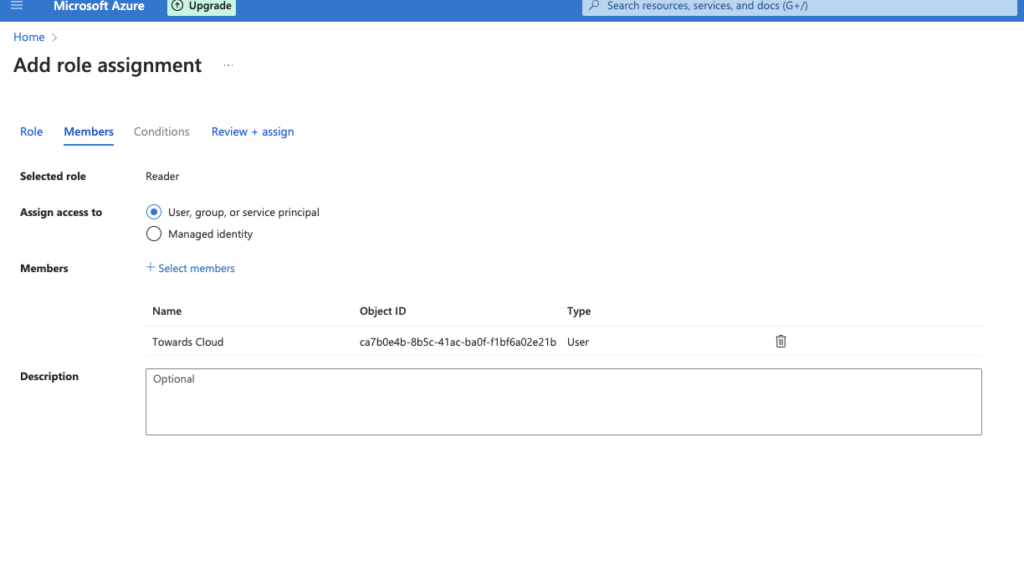
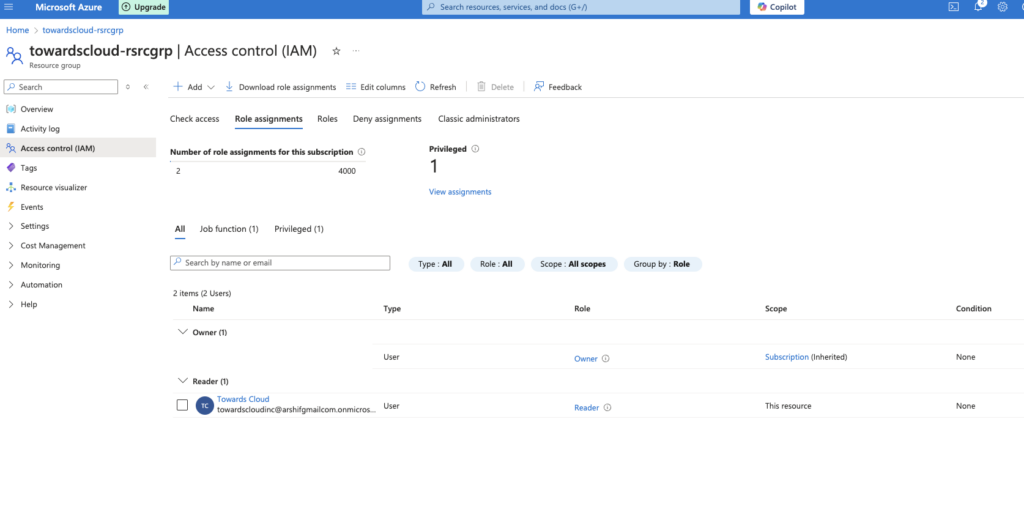
Assigning roles to users in Access Control (IAM).
Role-Based Access Control (RBAC) Overview | Microsoft Docs
Security Center: Your Cloud’s Bodyguard 🛡️
- Navigate to Security Center: Find it in the main menu.
- Review Recommendations: Get insights on how to improve your security posture.
- Implement Policies: Enforce rules across your resources.
Common Pitfall: Over-Permissioning 🚫
Avoid giving everyone the Owner role. Unless you want your intern accidentally deleting production resources! 😱
Monitoring and Alerts: The Cloud Watchers 👀
Keeping an Eye on Things 👁️
- Azure Monitor: Access it from the main menu.
- Set Up Alerts: Create alerts for metrics like CPU usage, failed requests, etc.
- Click “Alerts” > “New alert rule”.
- Define the target resource, condition, and action group.
- Configure notifications via email, SMS, or push notifications.
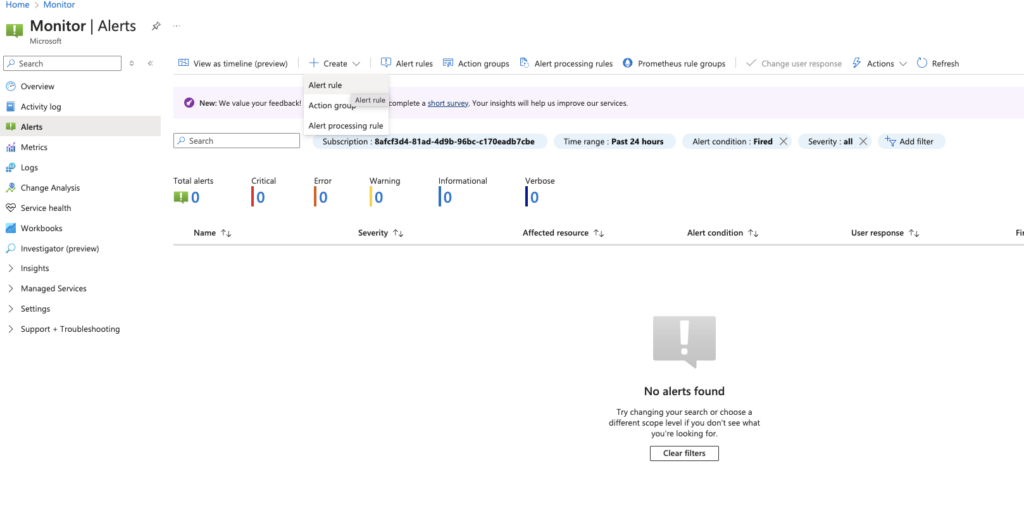
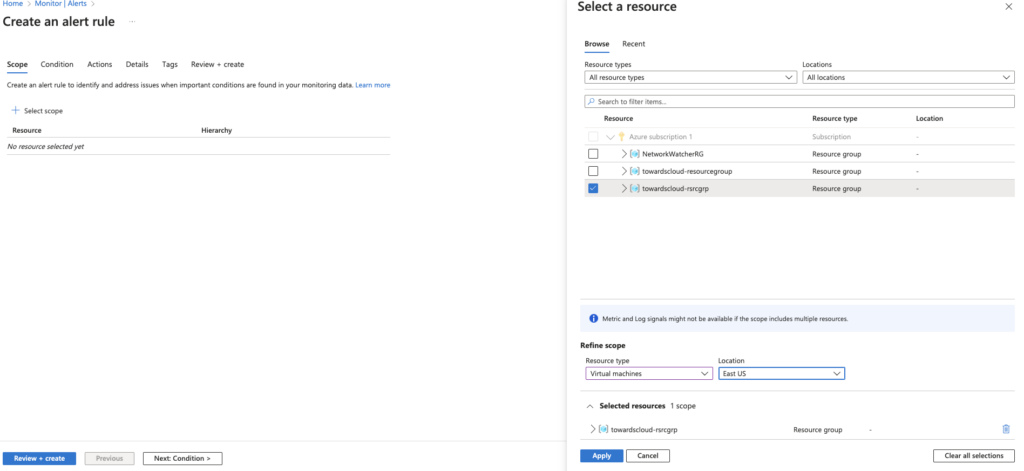
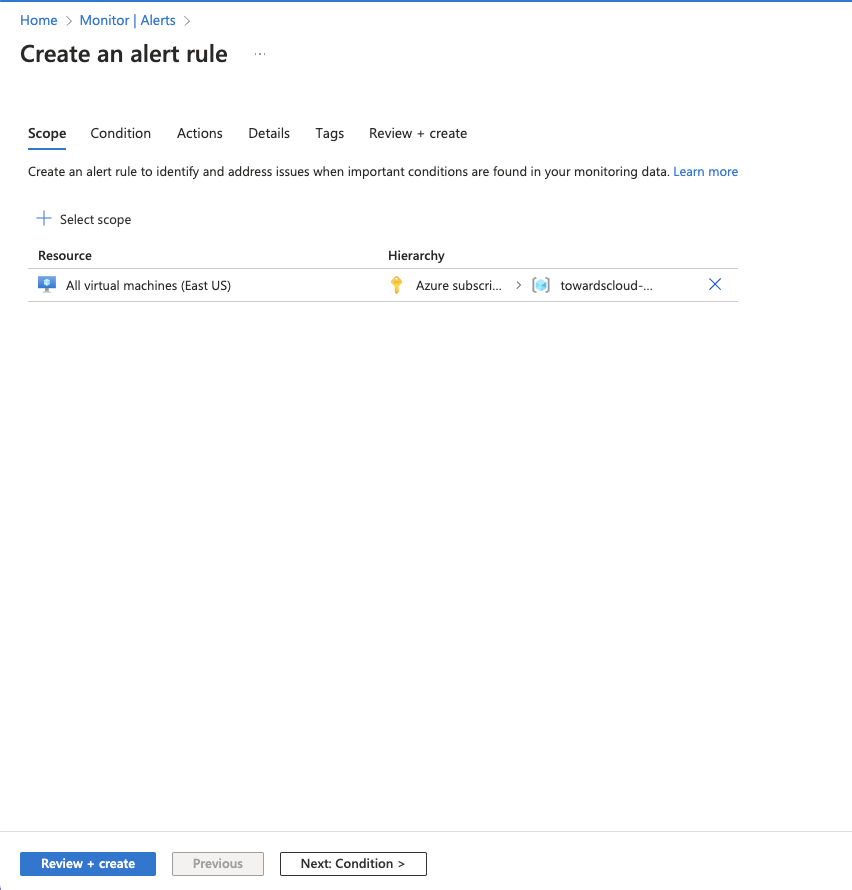
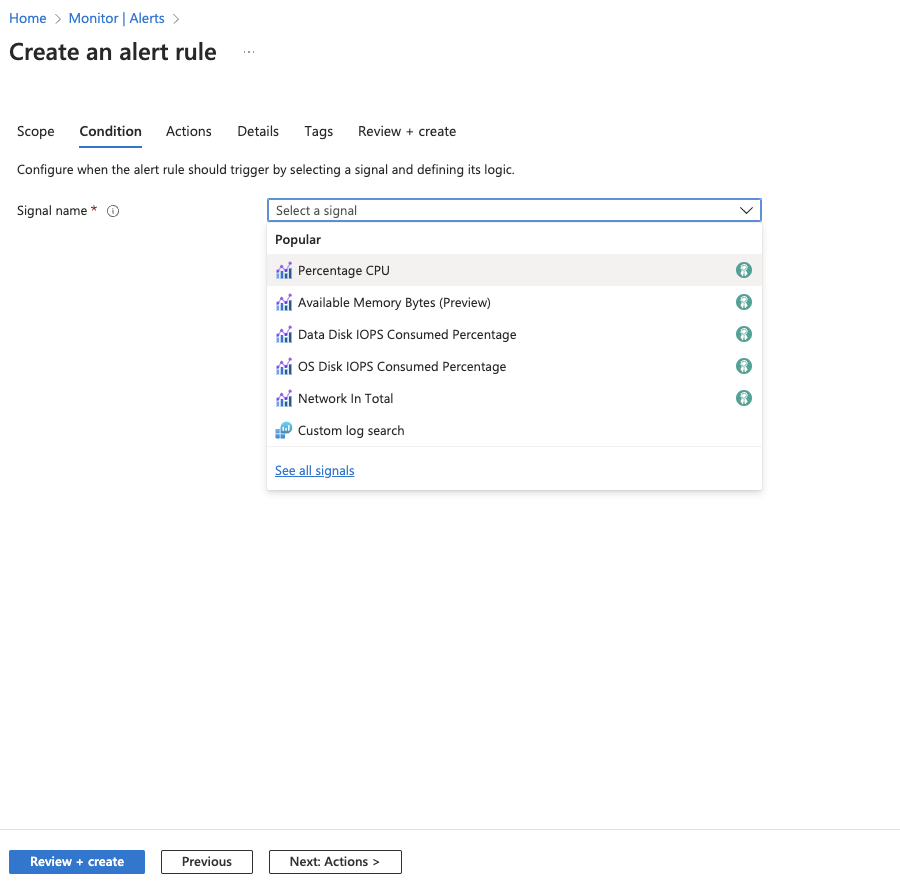
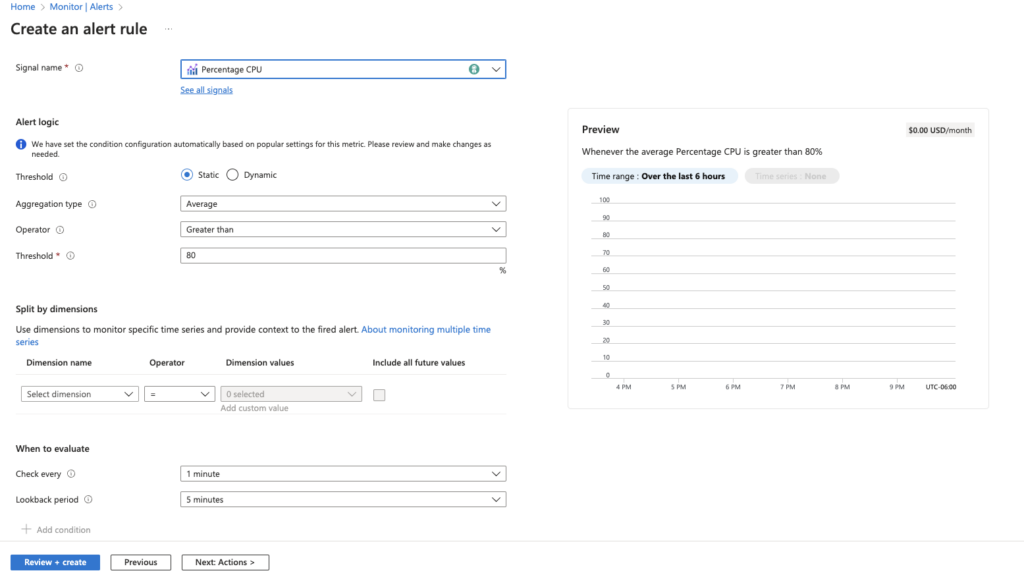
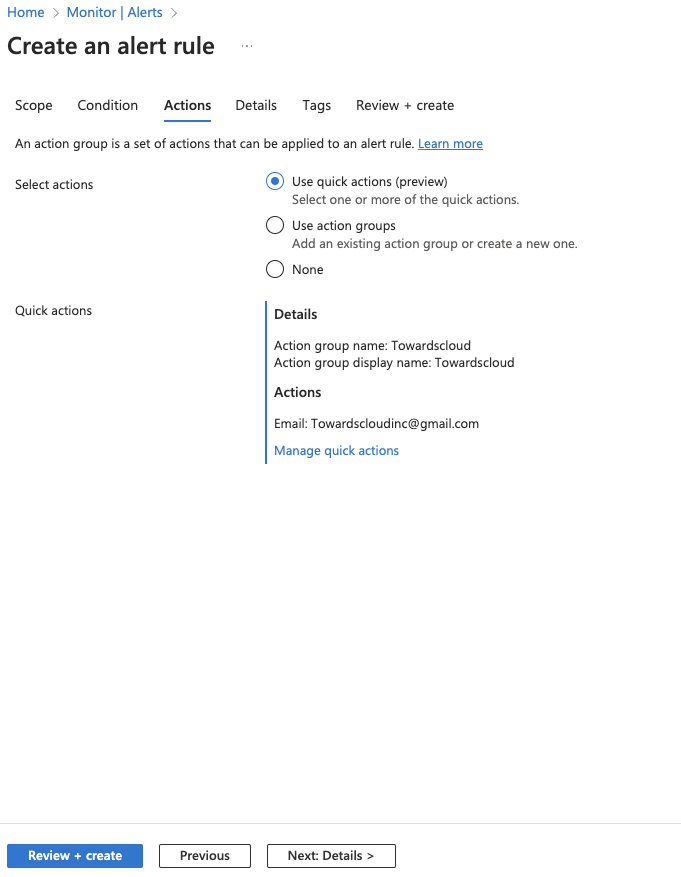
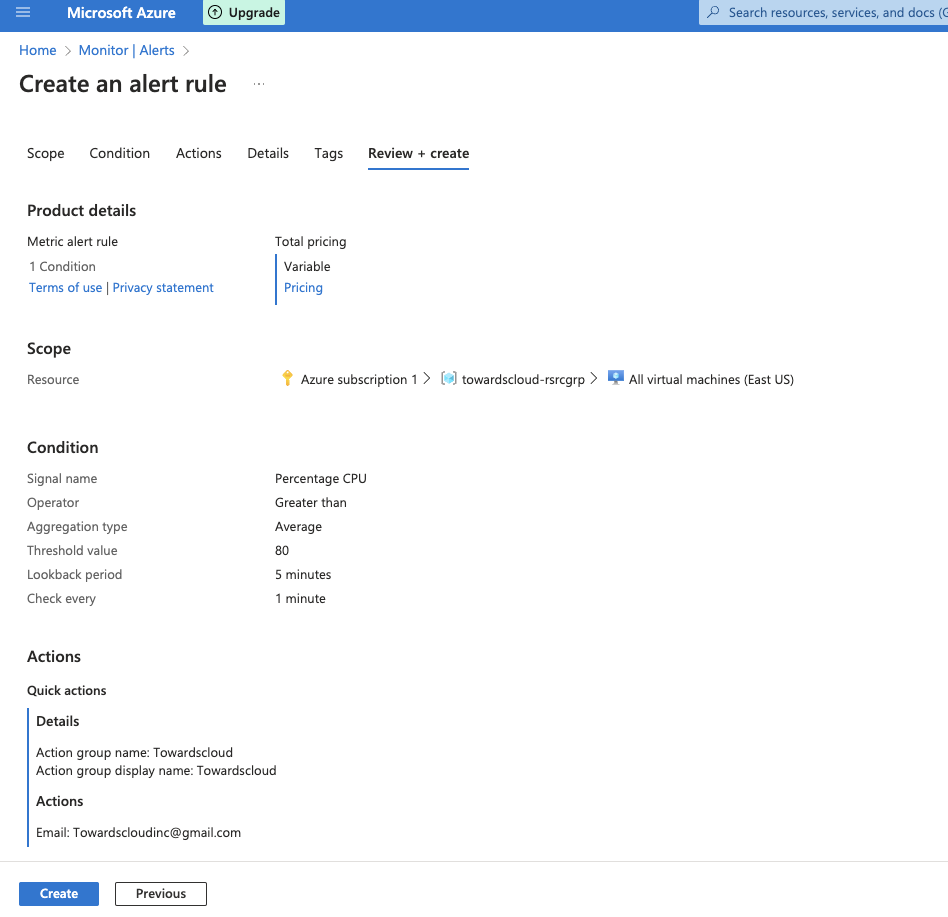
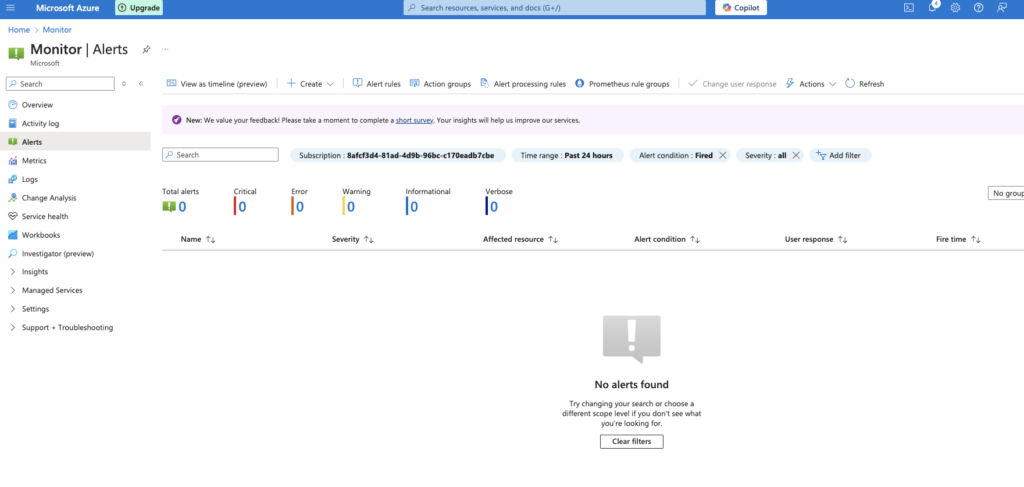
Setting up an alert rule in Azure Monitor.
Azure Monitor Overview | Microsoft Docs
%% Diagram: Azure Monitoring Flow
sequenceDiagram
    autonumber
    participant Resource
    participant Monitor
    participant You
    Resource->>Monitor: Sends Metrics
    Monitor->>You: Sends Alert if Threshold Exceeded
    Note right of You: © 2024 Towardscloud Inc.
Diagram: How Azure Monitor tracks resources and sends alerts.
Real-World Scenario: Avoiding Downtime 🕒
Set up an alert for your web app’s response time. If it exceeds 2 seconds, get notified instantly to take action before users start tweeting angrily! 🐦🔥
Azure Marketplace: Shopping in the Cloud Mall 🛍️
Exploring the Marketplace 🛒
Find pre-built solutions and services from Microsoft and partners.
- Click on “Marketplace” in the main menu.
- Browse categories or search for specific products.
- Click “Create” to deploy.
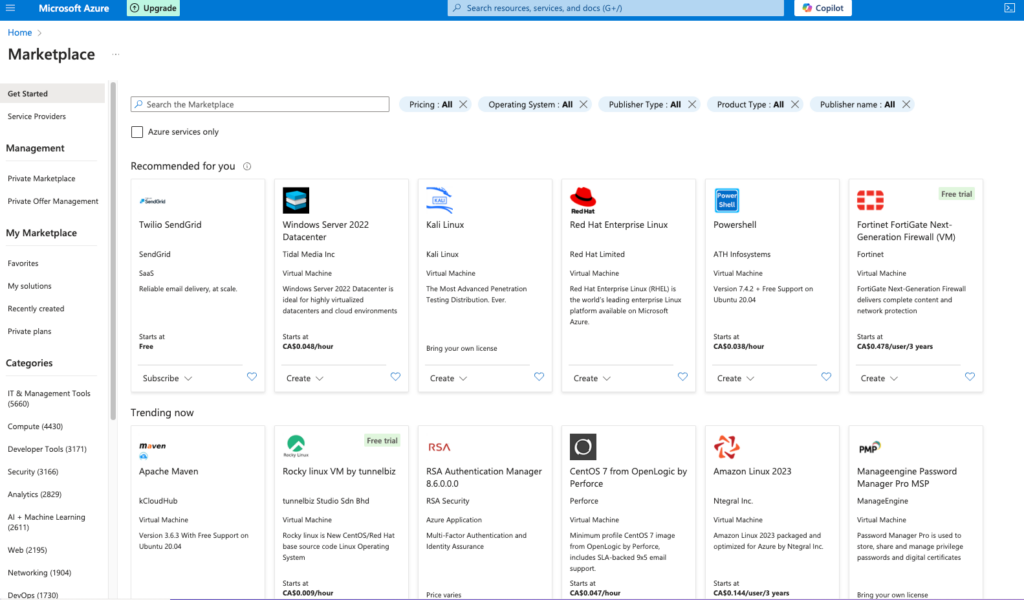
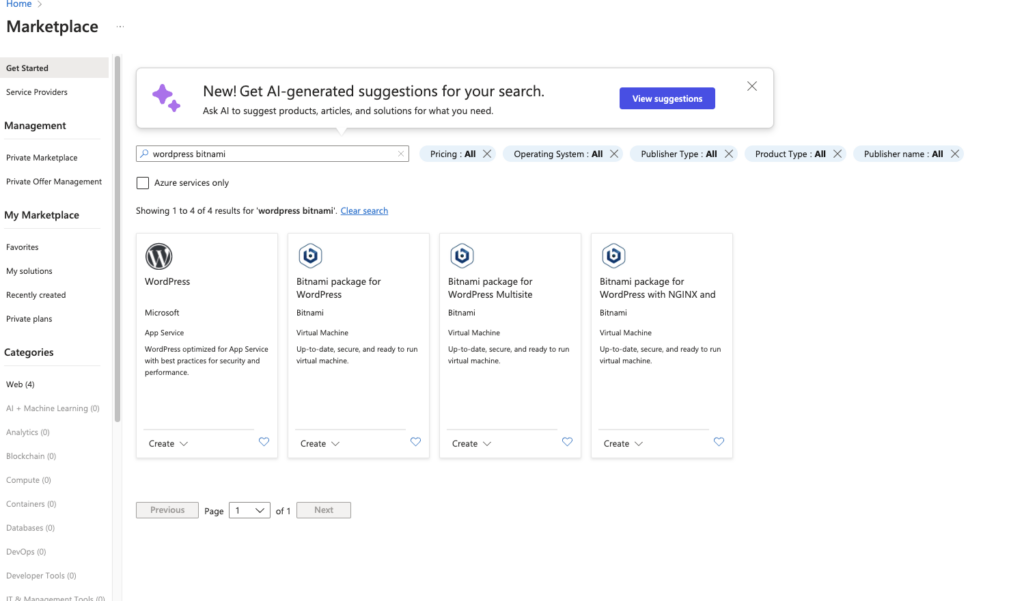
Azure Marketplace showcasing various solutions and services.
Azure Marketplace Overview | Microsoft Docs
Popular Picks 🌟
- WordPress: Deploy a blog faster than you can write your first post! 📝
- Ubuntu Server: Need a Linux VM? One-click deployment! 🐧
- SAP HANA: For the enterprise warriors out there. 🏰
Common Pitfalls and How to Avoid Them ⚠️
Pitfall 1: Leaving Resources Running 💸
Oops Moment: Forgetting to shut down that beefy VM and getting a surprise bill.
Solution: Use Azure Cost Management to monitor spending and set budgets.
Azure Cost Management and Billing | Microsoft Docs
Pitfall 2: Misconfigured Security Groups 🛑
Oops Moment: Accidentally exposing your database to the internet.
Solution: Regularly review security settings and use Network Security Groups to control traffic.
Pitfall 3: Ignoring Updates 🔄
Oops Moment: Missing out on new features or critical patches.
Solution: Subscribe to Azure updates and use Azure Advisor for recommendations.
Azure Advisor Overview | Microsoft Docs
Conclusion: You’ve Leveled Up! 🎮
Congratulations! You’ve navigated the Azure Portal like a seasoned cloud captain. 🚢 You customized dashboards, managed resources, tightened security, set up monitoring, and even did some cloud shopping!
But remember, the cloud is ever-changing—like a shapeshifter in a fantasy novel. 📚 Keep exploring, stay curious, and you’ll continue to unlock new achievements! 🏆
Additional Resources 📚
- Azure Portal Tips and Tricks: Azure Portal Tips and Tricks | Microsoft Docs
- Azure Architecture Center: Azure Architecture Center | Microsoft Docs
- Microsoft Learn: Free courses to sharpen your Azure skills. Microsoft Learn – Azure | Microsoft Docs
Got any Azure adventures or mishaps to share? Drop them in the comments below! Let’s learn and laugh together! 😂
Disclaimer: This blog is for educational and entertainment purposes. Always refer to the official Microsoft Azure documentation for the most up-to-date information.
Happy Cloud Navigating! ☁️🧭
Appendices 🗂️
Azure Portal Keyboard Shortcuts ⌨️
- G + D: Go to the dashboard.
- G + A: Open the all services menu.
- / (forward slash): Activate the global search.
Keyboard Shortcuts in the Azure Portal | Microsoft Docs
Feel free to share this guide with your fellow cloud enthusiasts. After all, sharing is caring—and it might just save someone from an Azure-induced headache! 🤕