Hello, future cloud aficionados! 👋 Ready to dive into the world of Microsoft Azure without burning a hole in your pocket? 💸 Let’s explore the Azure Free Tier and demystify the billing process. By the end of this guide, you’ll know how to make the most of Azure’s offerings while keeping costs in check. And yes, we’ll sprinkle in some humor along the way! 😉
Introduction to Azure Free Tier 🎉
Microsoft Azure offers a Free Tier to help you get started with cloud services without any upfront costs. It’s like a free sample at an ice cream shop—tasty and risk-free! 🍦
Azure Free Account | Microsoft Azure
Signing Up for Azure Free Tier 📝
Step-by-Step Guide 🚶♂️
- Visit the Azure Free Account Page:
- Go to the Azure Free Account page.
- Click on “Start for free”:
- It’s the big, enticing button. You can’t miss it! 😄
- Sign In or Create a Microsoft Account:
- Use an existing Microsoft account or create a new one.
- Identity Verification:
- Phone Verification: Enter your phone number for a verification code.
- Credit Card Verification: Provide a credit card for identity verification. Don’t worry; you won’t be charged!
Note: Prepaid and virtual credit cards are not accepted.
- Agree to the Terms:
- Read and accept the subscription agreement and privacy statement.
- Click “Sign up”:
- Voilà! You’re now ready to explore Azure.

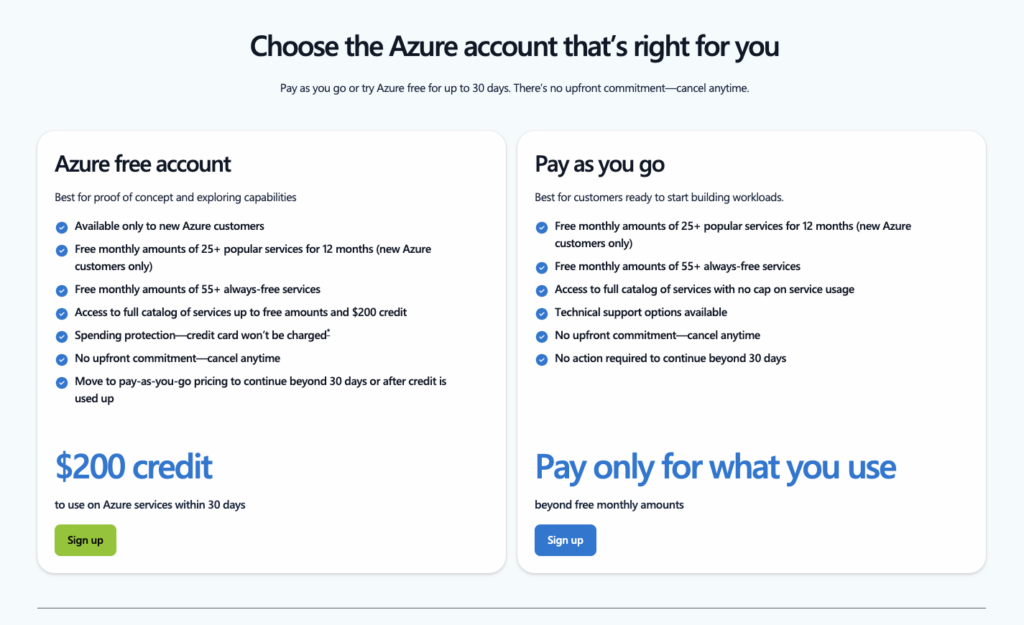
The Azure Free Account sign-up page highlighting the $200 credit “Sign up” button.
Create Your Azure Free Account Today | Microsoft Docs
What’s Included in the Free Tier 🎁
Azure Free Tier provides access to a variety of services, including:
Check URL for latest offerings : https://azure.microsoft.com/en-us/pricing/free-services
1. $200 Credit for 30 Days 💵
- Use the credit to try any Azure service.
2. Popular Services Free for 12 Months 🗓️
- Linux Virtual Machines: 750 hours B1S usage.
- Windows Virtual Machines: 750 hours B1S usage.
- Blob Storage: 5 GB of LRS hot block storage.
- Azure SQL Database: 250 GB storage.
3. 25+ Services Always Free ♾️
- Azure Functions: 1 million requests per month.
- Event Grid: 100,000 operations per month.
- AI and Machine Learning: Free tier for services like Azure Cognitive Services.
Azure Free Account FAQ | Microsoft Azure
Important Notes 📝
- Usage Limits: Stay within the specified limits to avoid charges.
- Expiration: After 12 months, services switch to pay-as-you-go pricing.
- No Automatic Charges: You’ll be notified before any charges occur.
Understanding Azure Billing 💳
Billing Structure Explained 🧐
Azure uses a pay-as-you-go model. You pay only for what you use, making it flexible but sometimes tricky.
- Resource Metering: Each service measures usage differently (hours, GBs, transactions).
- Billing Cycle: Typically monthly.
Understand Your Azure Bill | Microsoft Docs
Accessing Your Billing Information 📄
- Navigate to the Azure Portal:
- Go to “Cost Management + Billing”:
- Find it on the left-hand menu or search for it.
- View Invoices and Usage:
- Access detailed billing statements and download invoices.
Azure portal showing the Cost Management + Billing dashboard.
Monitoring and Managing Costs 📊
Set Up Billing Alerts 🚨
Prevent surprise charges by setting up alerts.
- Navigate to “Cost Management + Billing”.
- Click on “Budgets”.
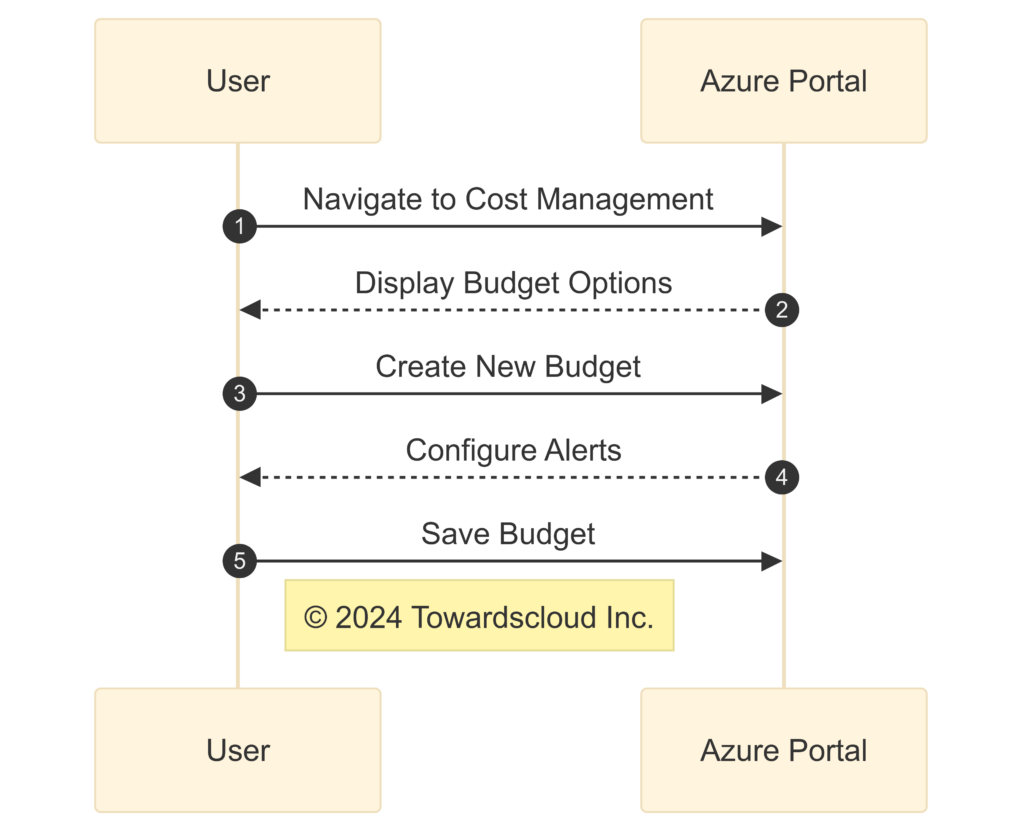
- Create a New Budget:
- Set your budget amount and time period.
- Configure Alerts:
- Receive notifications when spending reaches certain thresholds.
Tutorial: Create and Manage Budgets | Microsoft Docs

Steps to set up a budget in Azure Cost Management.
Use Azure Cost Management Tools 🛠️
- Cost Analysis: Break down costs by service, resource, or resource group.
- Cost Alerts: Get notified when costs exceed thresholds.
- Export Reports: Download data for offline analysis.
Best Practices for Cost Management | Microsoft Docs
Common Billing Pitfalls and How to Avoid Them ⚠️
Pitfall 1: Exceeding Free Tier Limits 🚫
Solution: Regularly monitor your usage.
- Action: Set up alerts for service-specific usage.
Pitfall 2: Forgetting to Deallocate Resources 💤
Unused resources can still incur charges.
- Solution: Always deallocate virtual machines when not in use.
Pitfall 3: Misunderstanding Service Costs 🤷♂️
Some services have hidden costs (e.g., data egress charges).
- Solution: Review the pricing details for each service.
Azure Pricing | Microsoft Azure
Real-World Examples 🌐
Example 1: Hosting a Small Website 🌍
- Services Used:
- Azure App Service (Free Tier)
- Azure SQL Database (Free for 12 months)
- Cost: Free, if within limits.
Example 2: Developing an AI Chatbot 🤖
- Services Used:
- Azure Bot Service (Always Free)
- Azure Cognitive Services (Limited free transactions)
- Cost: Free for development and testing; charges apply for higher usage.
Conclusion 🎉
Embarking on your Azure journey doesn’t have to be a costly affair. With the Azure Free Tier, you can explore a plethora of services at no cost. Just remember, like any good buffet, it’s all fun and games until you overindulge! 🍰 Monitor your usage, set up alerts, and you’ll be sailing smoothly in the cloud. ☁️
Additional Resources 📚
- Azure Free Account | Microsoft Azure
- Free Azure Services | Microsoft Azure
- Azure Cost Management and Billing Documentation | Microsoft Docs
- Azure Pricing Calculator | Microsoft Azure
- Understand Your Azure Free Account | Microsoft Docs
⚡
Disclaimer: This blog is for educational purposes. Always refer to the official Microsoft Azure documentation for the most up-to-date information.
Appendices 🗂️
Tips for Staying Within Free Tier Limits 🧐
- Regular Monitoring: Check your usage weekly.
- Automation: Use scripts to shut down resources when not in use.
- Understand Limits: Know the quotas for each free service.
Happy Cloud Computing! ☁️😄